Troubleshooting 101
Here's how to preserve evidence during a company accident investigation.
THE process of determining the cause of an equipment malfunction often can seem as daunting as a major crime scene investigation. It often appears to require expert knowledge about how the equipment was operated, how it was installed, the original design specs, changes in the environment, how it was actually being used, etc. Luckily, with just the right combination of repair expertise, root cause analysis, and corrective action implementation, the process does not necessarily have to be harder to get more productive and lasting results. Usually the right systems have already been purchased and put in place at most production facilities to get the data required for an accurate and detailed failure analysis.
Unfortunately, the employment of these resources is not always optimal. A smarter approach to the gathering of evidence, the correct interpretation of what that evidence is telling you, and the judicious application of corrective actions will put those expensive monitoring systems to work for you.
The Evidence Gathering Process
Most companies already have many systems in place that can help the troubleshooter narrow down his focus, but often the data are no longer available. The act of repairing the gear has already modified, moved, or destroyed key pieces of evidence. Although the failure appeared to be minor at first, these data points can be crucial to finding an actual root cause of equipment damage. Where do you get the evidence you need to determine the actual root cause of the failure?
A good place to start is with the equipment operators. How often have you heard (after the gear is down): "Oh, yeah, it's been doing that for a while" or "It's always been that way." This can be one of the most frustrating times in the life of the maintenance manager: listening to an operator describe in detail the telltale signs that his gear is about to fail. However, at this point in the failure analysis, this is just information to be gathered. The fact the operator did not inform anyone about the previous abnormalities is yet another data point. Again, this is only data that can be used later for root cause analysis and corrective actions. Do not draw any conclusions at this time.
Some companies have trained their operators to document immediately the conditions encountered at the time of a failure. The data often are written on a standard form or in the operator's log using an approved format. In either event, the report should include some basic information:
- Time and date
- The initial indication of the failure (loud vibration, initial alarm, etc.)
- Operator's name
- Operation being performed (start-up, shutdown, capacity test, etc.)
- Any alarm, indicator, warning, or other installed indication, including pressure and temperature of the process
- Environmental conditions (air conditioning secured for three hours)
- Physical conditions noted (smoke, noise, smell, hot to touch)
- Actions taken in response to the failure.
These data must be captured immediately upon recognizing the failure and any required action completed. The operator may be one of your best sources of information, but here caution is required. Although he may have the data:
- He may not know he has it. You may have to ask the right questions to get the information you are looking for.
- He may think he has it. In reality, he may have misinterpreted an indication, missed another indicator, or just not understood what he saw.
- He may not want you to have it. This is an angle on the investigation that I will not focus on at this point. Just be aware that the motivations of the people you are interviewing for data may not be known, and the answers you get may or may not match up with what really happened.
Equipment monitoring records and recordings contain a wealth of information. Vibration monitoring recordings, thermal images, and oil analysis results can be used to determine the timeline of events leading up to the failure. You may not know what to do with the data yet, but have them available and ready for further scrutiny.
Machinery history and repair records are invaluable. These records can be on paper or in electronic format. They can be used to discover long-term trends in equipment operational status and down-time analysis. Has this happened before? What caused it that time? How did we fix it last time? Did that fix work?
At this point, the usefulness of these records is established by past maintenance practices. Entries in these records that say (more or less), "Process pump #3 down due to pump failure" is much less useful than, "Process pump #3 secured (run hours 2910). Smoke noted issuing from mechanical seal upon initial start-up. Discovered clogged flush line. Line cleared, flow verified, seal replaced and retested." The second entry contains a wealth of information that can be used for a much better analysis of the reason it failed versus just a single failure datapoint. This entry would probably take the maintenance supervisor an extra three minutes to complete.
When should entries be made in the machinery history log? The best practice is to make a minimum of two entries: one immediately at the initial failure and one following repair and retest. If further indications were found, special troubleshooting methods were employed, or the troubleshooting was very complex, more entries can be made as required. Bottom line: for electronic recording systems, there cannot be too much data. Paper systems may require a more judicious use of space to prevent an unmanageable clutter but can still contain a good amount of information.
Another important information resource is the broken piece of equipment itself. It is critical that the troubleshooter look at the failed part to determine not only what broke, but how it broke. The failure mode and failure agents must be determined to find and eliminate the actual cause of the failure.
Sequencing the Analysis
The sequence of the data-gathering steps is actually fairly important. The operator should immediately write down his indication. The troubleshooter should talk to the operator early on to get his thoughts while the incident is still fresh in his mind. But when can equipment repair begin? After all, working in parallel to find the cause while simultaneously preparing for the repair just seems like good sense. However, this is where an enormous amount of information is often lost, destroyed, or altered. The following example illustrates how working ahead of the analysis can lead to frustrating rework.
Example
A plant was having its entire main condensate system overhauled. New piping was being installed, and the condensate pumps were to be rebuilt. Work began on the system by removing the pumps and hauling them to the pump shop for refurbishment. Piping in the system was cut out and replaced to correct below-spec minimum wall thicknesses.
The pumps were spec'ed out, rebuilt, and hydrostatically tested in the shop. No issues were found.
Two months after their removal, the pumps were re-installed in the system. The system was filled, vented, and tested, one pump at a time. After running for 20 hours, the lower pump bearing failed, as indicated by excessive vibration.
The pump was removed from the system and inspected. The lower pump bearing was found to have failed. The bearing was replaced and the pump re-installed. Twelve hours after start-up for run-in, the bearing again failed.
This time, the ace pump re-builder was called in. Obviously, someone was not installing the bearing correctly. He had been doing this for years and would make sure the job was done correctly this time. He personally supervised the rebuilding and retesting of the pump. It was run on a test fixture for 80 hours with all vibration measurements well within spec. Everything looked fine from his perspective. He saw nothing that he recognized as a problem from his experience.
The pump was again re-installed and retested. The bearing failed for the third time after 20 hours of operation. Each bearing replacement cost more than $23,000 for parts and labor alone. So far, this equated to nearly $70,000, not including the slip in delivery date, the extra time and effort expended by the expert pump supervisor, and the extensive pre-installation vibration testing on the third go-around. Unfortunately, the pump was in worse condition than before the overhaul.
This is just an isolated incident, right? Recently, a company was having problems with the mechanical seals on two alkali process pumps at its plant. Management replaced the seals 23 times in a 12-month period. In addition to the $500,000 in lost production, the last replacement resulted (because of a lockout/tagout error) in an explosion with personnel injury and more than $12 million in facility damage.
Finding the culprit
From this example, with the data you have been given, the cause of the bearing failure will not be obvious. Even the expert is left scratching his head. How do you go about finding the cause of this type of failure?
The sequence of evidence gathering listed above was followed for all three bearing failures. Obviously, there must be something else going on that even the "pump guru" was not aware of or hadn't thought of. What do you do?
This facility fell into one of the traps many companies stumble into: Repairs were commenced before the failure analysis was complete. Companies want to get ahead and disassemble the pump, but this can lead to the disruption (or destruction) of evidence needed to determine the cause. But wait a minute. We determined earlier that one of the most important pieces of the puzzle is the failed component. How can we analyze the bearing if we don't first disassemble the pump? We seem to need to know the possible causes before we even start the disassembly!
This is a great question. It runs to the core of why many troubleshooting and repair scenarios end with a rework of the same failure.
The right way
Let's walk through the above example again, using what we've discussed.
The first step in any root cause analysis should be to diagram out exactly what happened. This can be done using a dry-erase board or specialty software:
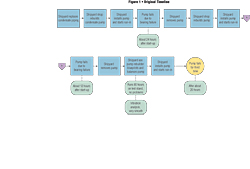
By using this system, a timeline is set up with all known data incorporated into an easy-to-understand format. It may be tempting to skip this part ("I know what happened!"), but this is a crucial step in understanding exactly what happened when.
Now, we need to try looking for the cause of the failure. This isn't easy. We are tempted to start ripping and tearing into the gear, looking for obvious problems and setting up for the repair work. Though this is the normal practice, again, it can be self-defeating. As disassembly continues, our technicians may not know what to look for. They are doing the best they can, but generally they may not have the expertise or the guidance to look for the right thing. In this example, the shop removing the pump is the rigging shop. They are good at what they do, but they are not pump rebuilding experts by any stretch of the imagination.
Before disassembly, you must have a list of probable failure modes. These can be obtained from many sources. Previous troubleshooting and repair records are a great resource for recurring failures (although the fact they are recurring should catch your attention). If you are lucky enough to have that expert on site, use him. There may even be troubleshooting tables available that can give you guidance on where to start looking.
In this example, the possibilities you have put together include:
- A bent shaft
- Distorted pump casing due to piping strain
- Pump/motor misalignment
- Pump imbalance
- Motor imbalance
- Motor electrical problems
You can eliminate many of these causes right away (the pump had been verified in balance, the shaft was not bent, etc.). The possible remaining causes are now known, and valuable data can be brought to the job site to find the actual cause. You now know the right questions to ask during the equipment teardown:
- Is there a misalignment between the pump and motor?
- Is there casing distortion due to excessive pipe strain?
At this point, you can continue the investigation just like any other. Because you know what to ask, you know what to look for. You can go to the job site and gather the extra data you need. In this case, before the pump is unbolted from the foundation, you notice the riggers are connecting chain falls to the discharge piping and the pump. When questioned, the riggers tell you it took chain falls to get the piping aligned during installation, and there will be quite a bit of tension as the flange bolts are loosened.
The root cause?
Our timeline would now look something like this:
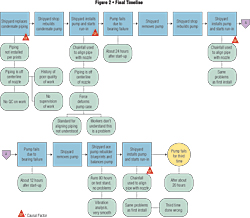
We found the root cause! Those mechanics obviously don't know what they're doing and are flexing the pipe (and the pump casing) too much. Tell those mechanics to line it up right next time!
Sound reasonable? Of course not. Unfortunately, this is the type of response that is heard over and over again throughout industry. "Tell those guys to be more careful." This has the same effect as telling your son (after he's run over the mailbox) to drive more carefully in the future. You'll get a half-hearted "Okay," and nothing has changed.
These are not the root causes. After completing the investigation and fully analyzing the problems, several root causes may be found. For example:
- The prints used to fabricate the piping contained a typographical error, causing the incorrect piping length to be used.
- Riggers were not trained on the correct method of rigging in pumps.
- A procedure for rigging in the pump was already written, but it was buried in the notes section of the piping print.
- No audits had ever been conducted on rigging large pumps and valves into position.
- Supervisors were not available during the rigging.
- The personnel in the pump shop did not communicate effectively to the riggers.
- After the first failure, there was no process in place to determine the actual root cause. (In actuality, this incident was discovered by an independent supervisor working another job watching the riggers install the chain falls.)
Corrective Actions
This is another point in the incident investigation process that often fails. Corrective actions must now be assigned that are meaningful and achievable with measurable results. For example, it does no good to tell the workers to be more careful. Each of the root causes must be addressed on its own merit, with corrective actions assigned, carried through, and audited.
Best Practice
Who has time for this type of analysis? In reality, all best-in-class companies have found the time. The time spent properly following up on equipment failures is rarely wasted time. In fact, the savings are compounded, twofold. In this particular case, the time spent conducting a proper equipment failure analysis would have saved the shipyard the three weeks and some $150,000 in delays after the first bearing failure. In addition, if the corrective actions are not implemented, this same issue is almost guaranteed to happen again, causing repeat equipment failures and delays further down the road.
Unfortunately, this scenario is not an isolated case. Every plant has at least one of these stories to tell. Not every plant can say it has come up with a proven system that has averted further repeat problems. Studies have shown that industry is not meeting the best-practice mix of maintenance resource strategies:
| |
Corrective |
Predictive |
Preventative |
Proactive |
|
Best Practice |
10% |
50% |
30% |
10% |
|
Actual |
40% |
30% |
20% |
10% |
Industry is spending large sums of money on predictive maintenance systems allowing managers to know when the gear is about to fail, but none of these systems can tell you why. It is up to the trained investigator, with the right tools, to be able to avoid the costly repeat failures that continue to plague the manufacturing field.
By ensuring failures are understood and fixed right the first time, enormous amounts of time, effort, and money can be saved, allowing your production lines to remain operating at peak capacity.
This article appeared in the October 2006 issue of Occupational Health & Safety.
]
This article originally appeared in the October 2006 issue of Occupational Health & Safety.